Writing a Novel with Visual Studio Code
If you’re a software developer who also loves to indulge in novel writing, you might be intrigued to discover that you don’t necessarily need a specialised writing tool. Visual Studio Code, the versatile code editor, can prove to be a surprisingly effective ally in your creative writing endeavours. Let’s delve into how Visual Studio Code can enhance your novel-writing experience.
I’ve explored various writing tools in my quest for one that fits my writing style. I started with Microsoft Word and Google Docs, but I found them lacking when it came to providing a comprehensive view of my narrative structure while keeping the main writing pane front and centre. Then, I briefly ventured into Scrivener, a renowned tool for novelists, but I discovered it was packed with features I didn’t necessarily need or want.
Visual Studio Code comes to the rescue, offering a range of features that make it a powerful tool for novelists right out of the box:
Markdown Support
Visual Studio Code seamlessly supports Markdown, a lightweight markup language that allows you to structure your novel with ease. Markdown enables you to incorporate formatting, headers, links, and more into your writing.
Organised Folders
Just as you would organise your code projects, you can structure your novel in Visual Studio Code. You can create folders to manage various aspects of your writing project, such as character notes, research findings, templates, plot outlines, character dialogues, and more. Maintain a structured hierarchy to keep your work organised.
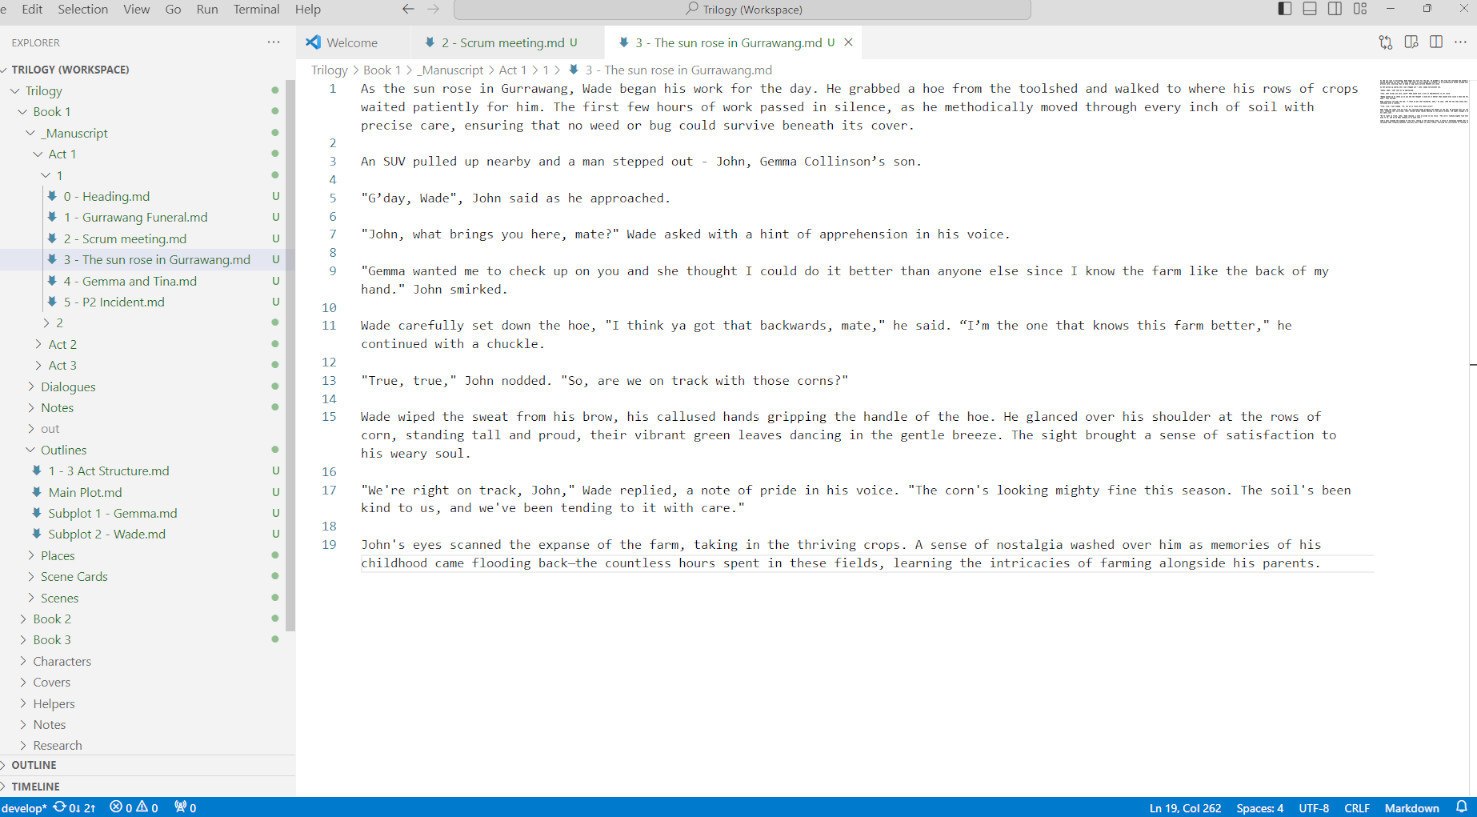
The folder structure doesn’t need to follow a specific format as long as the files and folders are in alphabetical order. One example is as follows:
└───_Manuscript
    ├───Act 1
    │   ├───Chapter 1
    │   │       scene1.md
    │   │       scene2.md
    │   │       scene3.md
    │   │
    │   ├───Chapter 2
    │   │       scene1.md
    │   │       scene2.md
    │   │
    │   └───Chapter 3
    │           scene1.md
    ├───Act 2
    │   │
    │   ├───Chapter 4
    │   │       scene1.md
    │   │       scene2.md
    │   │
    │   ├───Chapter 5
    │   │       scene1.md
    │   │       scene2.md
    │   │
    │   └───Chapter 6
    │           scene1.md
    └───Act 3
        ├───Chapter 7
        │       scene1.md
        │
        ├───Chapter 8
        │       scene1.md
        │
        ├───Chapter 9
        │       scene1.md
        │       scene2.md
        │
        └───Chapter 10
                scene1.md
Version Control
You can leverage the graphical user interface of your preferred version control system to compare files side by side and maintain a comprehensive history of your novel. In many version control systems, you have the option to tag commits / check-ins, allowing you to assign them a version number. For example, you might have a two-part version number, allocating the major number to represent your draft’s version and the minor number for revisions. This approach also enables you to keep track of the specific versions you share with your editor and others that you share your drafts with.
Pandoc
To transform your document into a Word document, you can utilise Pandoc, a utility designed for converting from one document format to another. Pandoc can take your Markdown files, be they chapters or individual scenes, and compile them into a cohesive manuscript.
With Pandoc, you can customise the appearance of your manuscript to your specifications. By providing Pandoc with a custom reference Word document, you can control fonts and page borders. You can also denote when to break the page for new chapters. I use Word’s “Heading 1” style to start my chapters with, and have customised the “Heading 1” style to start with a page break. By default, Pandoc converts Markdown headings into Word headings and displays them accordingly in the resulting Word document. Therefore, when it encounters a single hash symbol in the text, it applies Word’s “Heading 1” style, resulting in a page break.
For reference, a typical Pandoc invocation using a reference document looks like this:
pandoc combined.md --reference-doc=your-reference-file.docx -o your-novel.docx
I’ve also written a custom sctipt that compiles a list of markdown files in your manuscript location in alphabetical order and then feed that list to pandoc. It also injects a scene separator between scenes but not if it detects a chapter (a chapter is marked by one hash, which is Heading 1 in markdown, which I reserve for denoting a new chapter in the manuscript). Plus, it also takes care of versioning your work by tagging your commits (works with Git only).
Drawbacks
While Visual Studio Code can be a powerful ally for novel writers, it’s important to acknowledge some drawbacks:
Lack of Specialised Writing Tools
Unlike dedicated writing software like Scrivener, Visual Studio Code doesn’t offer specialised tools for novelists, such as character and plot management or storyboarding.
No Mobile Support
Visual Studio Code is a desktop application for writing code, and there is no version available for Android or iOS devices, limiting your writing flexibility on mobile platforms.
No Built-in Proofreading
Visual Studio Code lacks built-in proofreading features. You would need to copy and paste your text into external tools like Grammarly for grammar and spell checking.
No Pandoc Support for Mobile
Pandoc is a command-line utility for converting document formats, and it isn’t commonly available as a mobile application.
Visual Studio Code, equipped with its native support for Markdown, folder structuring reminiscent of coding projects, tapping into version control and command-line tools, stands as a powerful and highly adaptable tool for writers who also have a technical background. Nevertheless, it’s crucial to carefully evaluate the benefits and drawbacks while keeping your unique writing requirements and preferences in mind.

- Now Generating URL Slugs With Natural Language Processing!
- Safe Storage of App Secrets in Python Development
- Automate All The Things: A Manifesto for Building Better Teams
- Preserve commit history when moving files across Git repositories
- Publishing a Jekyll site to a separate Github Pages repository using Github Actions